1. 新建 Spring 项目
-
打开 IntelliJ IDEA:
- 点击
File > New > Project。
- 点击
-
选择 Spring Initializr:
- 填写项目基本信息:
- Group:
com.example - Artifact:
file-upload-download - Type: Maven
- Java Version: 17 或其他兼容版本。
- Group:
- 填写项目基本信息:
-
选择依赖:
- 添加以下依赖:
- Spring Web(核心依赖,用于开发 MVC 应用)
- Spring Boot DevTools(便于热加载开发)
- Lombok(简化实体类编写)
- 添加以下依赖:
-
完成项目创建:
- 点击
Next,等待 IDEA 完成项目生成。
- 点击
目录结构
最终的项目结构如下:
📂 src
├── 📂 main
│   ├── 📂 java
│   │   └── 📂 com.example.fileuploaddownload
│   │       ├── 📄 FileUploadDownloadApplication.java
│   │       └── 📂 controller
│   │           └── 📄 FileController.java
│   ├── 📂 resources
│   │   └── 📄 application.properties
└── 📂 test
    └── 📂 java
配置项目
3.1 修改 application.properties
在 src/main/resources/application.properties 中添加以下配置:
# 文件上传临时路径和大小限制
spring.servlet.multipart.max-file-size=10MB
spring.servlet.multipart.max-request-size=10MB

# 配置静态资源文件夹,支持直接访问文件
spring.web.resources.static-locations=file:D:/uploads/
3.2 创建上传目录
- 在
D:/目录下手动创建uploads文件夹,用于保存上传的文件。
4. 编写代码
4.1 创建 Controller 类
在 src/main/java/com/example/fileuploaddownload/controller 下创建 FileController.java:
package com.example.fileuploaddownload.controller;
import org.springframework.core.io.Resource;
import org.springframework.core.io.UrlResource;
import org.springframework.http.HttpHeaders;
import org.springframework.http.ResponseEntity;
import org.springframework.web.bind.annotation.*;
import org.springframework.web.multipart.MultipartFile;
import org.springframework.http.HttpStatus;
import java.io.File;
import java.io.IOException;
import java.net.MalformedURLException;
@RestController
@RequestMapping("/file")
public class FileController {
// 文件保存路径
private static final String UPLOAD_DIR = "D:/uploads/";
// 文件上传接口
@PostMapping("/upload")
public ResponseEntity<String> uploadFile(@RequestParam("file") MultipartFile file) {
if (file.isEmpty()) {
return ResponseEntity.status(HttpStatus.BAD_REQUEST).body("文��件不能为空");
}
try {
// 创建上传目录(如果不存在)
File uploadDir = new File(UPLOAD_DIR);
if (!uploadDir.exists()) {
uploadDir.mkdirs();
}
// 保存文件
String filePath = UPLOAD_DIR + file.getOriginalFilename();
file.transferTo(new File(filePath));
return ResponseEntity.ok("文件上传成功: " + file.getOriginalFilename());
} catch (IOException e) {
return ResponseEntity.status(HttpStatus.INTERNAL_SERVER_ERROR).body("文件上传失败");
}
}
// 文件下载接口
@GetMapping("/download/{filename}")
public ResponseEntity<Resource> downloadFile(@PathVariable("filename") String filename) {
try {
// 文件路径
File file = new File(UPLOAD_DIR + filename);
if (!file.exists()) {
return ResponseEntity.status(HttpStatus.NOT_FOUND).body(null);
}
// 转为资源对象
Resource resource = new UrlResource(file.toURI());
return ResponseEntity.ok()
.header(HttpHeaders.CONTENT_DISPOSITION, "attachment; filename=\"" + resource.getFilename() + "\"")
.body(resource);
} catch (MalformedURLException e) {
return ResponseEntity.status(HttpStatus.INTERNAL_SERVER_ERROR).body(null);
}
}
}
4.2 启动类
在 src/main/java/com/example/fileuploaddownload 下找到 FileUploadDownloadApplication.java:
package com.example.fileuploaddownload;

import org.springframework.boot.SpringApplication;
import org.springframework.boot.autoconfigure.SpringBootApplication;

@SpringBootApplication
public class FileUploadDownloadApplication {
    public static void main(String[] args) {
        SpringApplication.run(FileUploadDownloadApplication.class, args);
    }
}
5. 启动项目
- 点击右上角绿色三角按钮运行项目。
- 确保项目运行成功,默认监听端口为
http://localhost:8080。
6. 测试接口
6.1 测试上传接口
-
使用 Postman 发送
POST请求到:http://localhost:8080/file/upload -
请求参数:
- Key:
file(类型:File) - Value:选择本地文件。
- Key:
-
响应:
文件上传成功: example.txt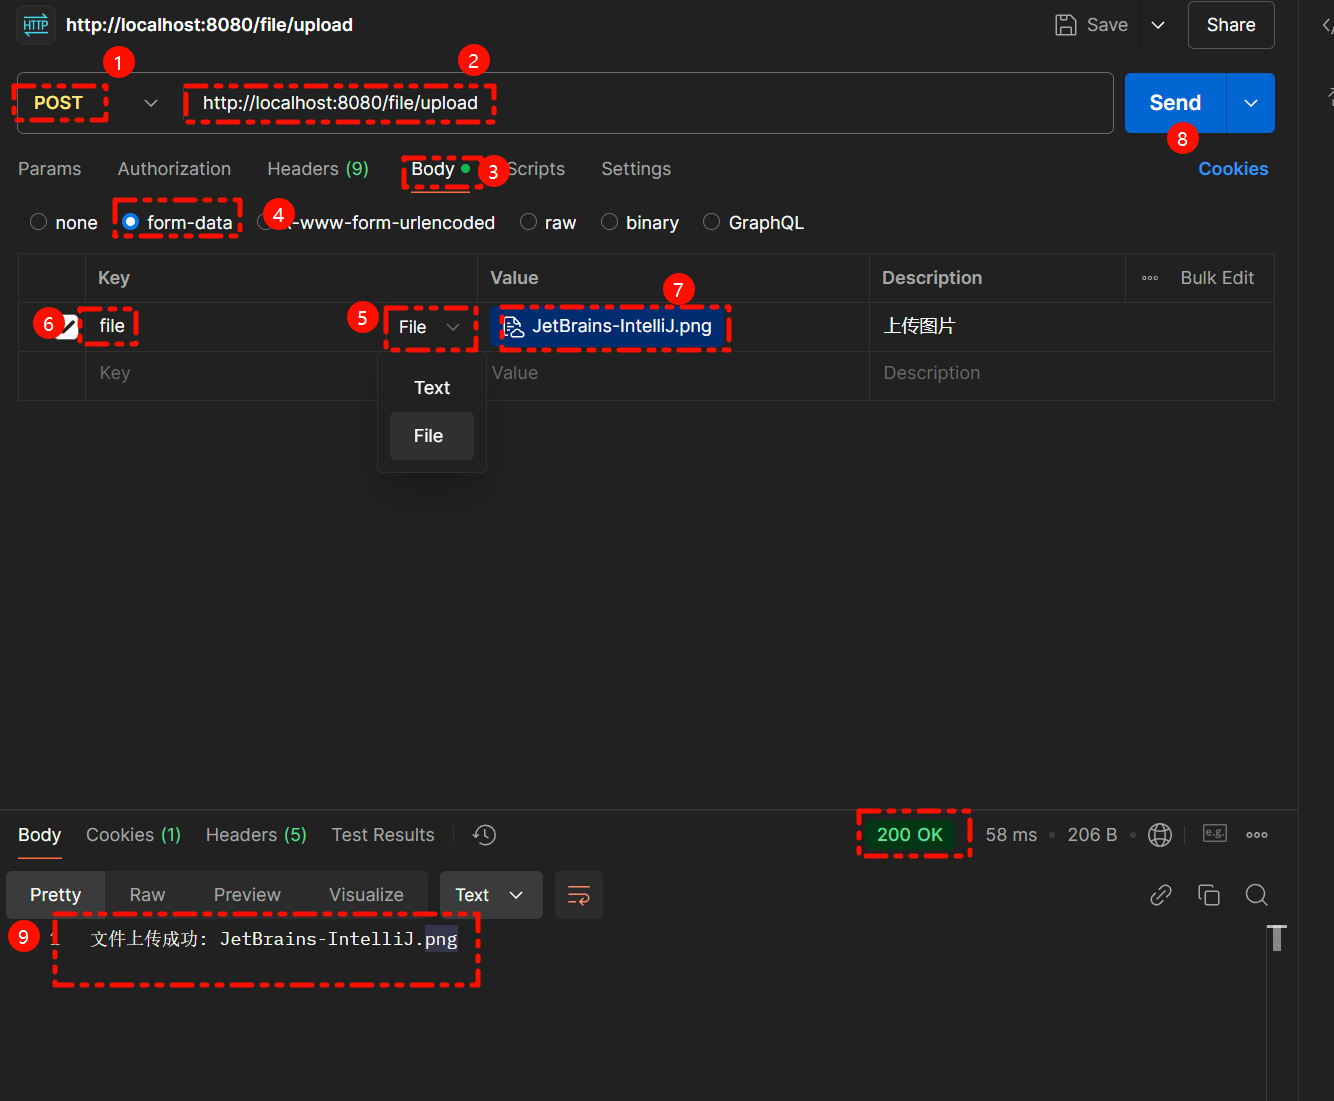
6.2 测试下载接口
- 在浏览器或 Postman 访问:
http://localhost:8080/file/download/example.txt - 文件将被下载到本地。

至此,Spring MVC 文件上传和下载功能已完成!
加载评论中...