在本指南中,我们将详细介绍如何使用IntelliJ IDEA创建一个基于SpringMVC的项目,并实现一个简单的登录功能。我们将使用Java 23作为开发语言,并配置最新的项目设置。
1. 创建SpringMVC项目
- 打开IDEA:启动IntelliJ IDEA。
- 新建项目:选择
File -> New -> Project。 - 选择Spring Initializr:在项目类型中选择
Spring Initializr。 - 配置项目信息:
- Name: LoginDemoProject
- Group: com.example
- Artifact: login-demo
- Language: Java
- Java Version: 23
- 添加依赖:
- 选择
Spring Web和Thymeleaf(用于视图渲染)。
- 选择
2. 项目结构
创建完成后,项目结构应如下所示:
src
├── main
│  ├── java
│  │  └── com
│  │      └── example
│  │          └── logindemo
│  │              ├── controller
│  │              │  └── LoginController.java
│  │              └── LoginDemoApplication.java
│  └── resources
│      ├── static
│      ├── templates
│      │  ├── login.html
│      │  ├── login-success.html
│      │  └── login-failure.html
│      └── application.properties
3. 代码实现
LoginController.java
package com.example.logindemo.controller;

import org.springframework.stereotype.Controller;
import org.springframework.web.bind.annotation.GetMapping;
import org.springframework.web.bind.annotation.PostMapping;
import org.springframework.web.bind.annotation.RequestParam;

@Controller
public class LoginController {

    // 硬编码的用户名和密码
    private static final String VALID_USERNAME = "admin";
    private static final String VALID_PASSWORD = "password";

    @GetMapping("/login")
    public String showLoginPage() {
        return "login";
    }

    @PostMapping("/login")
    public String processLogin(@RequestParam String username,
                               @RequestParam String password) {
        // 简单的登录验证
        if (VALID_USERNAME.equals(username) && VALID_PASSWORD.equals(password)) {
            return "login-success";
        } else {
            return "login-failure";
        }
    }
}
login.html (Thymeleaf模板)
<!DOCTYPE html>
<html xmlns:th="http://www.thymeleaf.org">
<head>
    <title>Login</title>
</head>
<body>
    <h2>Login</h2>
    <form th:action="@{/login}" method="post">
        <div>
            <label>Username:</label>
            <input type="text" name="username" required>
        </div>
        <div>
            <label>Password:</label>
            <input type="password" name="password" required>
        </div>
        <div>
            <button type="submit">Login</button>
        </div>
    </form>
</body>
</html>
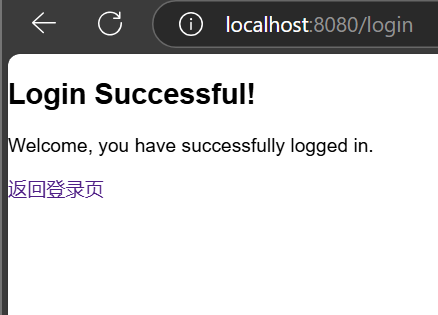
login-success.html
<!DOCTYPE html>
<html>
<head>
    <title>Login Success</title>
</head>
<body>
    <h2>Login Successful!</h2>
    <p>Welcome, you have successfully logged in.</p>
    <a href="/login">返回登录页</a>
</body>
</html>
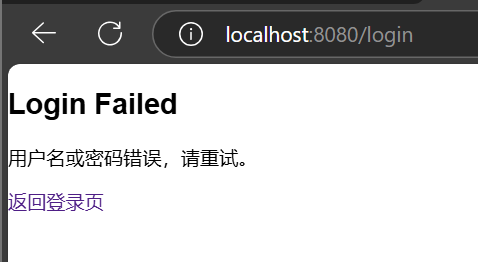
login-failure.html
<!DOCTYPE html>
<html>
<head>
    <title>Login Failed</title>
</head>
<body>
    <h2>Login Failed</h2>
    <p>用户名或密码错误,请重试。</p>
    <a href="/login">返回登录页</a>
</body>
</html>
application.properties
# 配置服务器端口(可选)
server.port=8080

# 配置静态资源路径(可选)
spring.web.resources.static-location=classpath:/static/

# Thymeleaf配置
spring.thymeleaf.prefix=classpath:/templates/
spring.thymeleaf.suffix=.html
spring.thymeleaf.mode=HTML
spring.thymeleaf.encoding=UTF-8
spring.thymeleaf.cache=false
4. 运行项目
-
找到
LoginDemoApplication.java文件。 -
右键点击并选择运行。
-
在浏览器中访问
http://localhost:8080/login。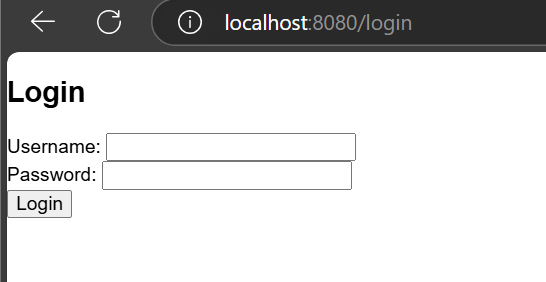
登录测试
- 用户名: admin
- 密码: password
成功登录后将跳转到成功页面,失败则跳转到失败页面。
希望这个详细步骤能帮助您使用SpringMVC完成简单的登录功能。
加载评论中...